Address
Malik Saleem Plaza, New City, Wah
Pakistan
WhatsApp: +92 327 510047
Email: info@developmech.com
Work Hours
Monday to Friday: 3PM - 11AM
Weekend: 10AM - 5PM
Address
Malik Saleem Plaza, New City, Wah
Pakistan
WhatsApp: +92 327 510047
Email: info@developmech.com
Work Hours
Monday to Friday: 3PM - 11AM
Weekend: 10AM - 5PM

The two setup choices near wall mesh (y+) and turbulence model that quietly decide whether your drag coefficient is trustworthy
Developmech | Computational Fluid Dynamics
Here’s a scenario that plays out in hardware teams more often than anyone admits. You run a CFD study on your drone body, your product enclosure, or an air duct. The solver returns a drag coefficient say, Cd = 0.32 you drop it into your range or thermal calculation, and you move on.
Then someone re-runs the same geometry with a slightly different mesh and turbulence model and gets Cd = 0.45. Same CAD. Same solver. A 40% swing in the number your entire performance estimate depends on.
Neither run threw an error. That’s the trap. CFD almost never tells you it’s wrong it just hands you a confident, precise, and sometimes badly incorrect number. For drag specifically, two setup choices do most of the damage: how you resolve the flow near the wall (your y+), and which turbulence model you pick. Get either wrong and your Cd is fiction.
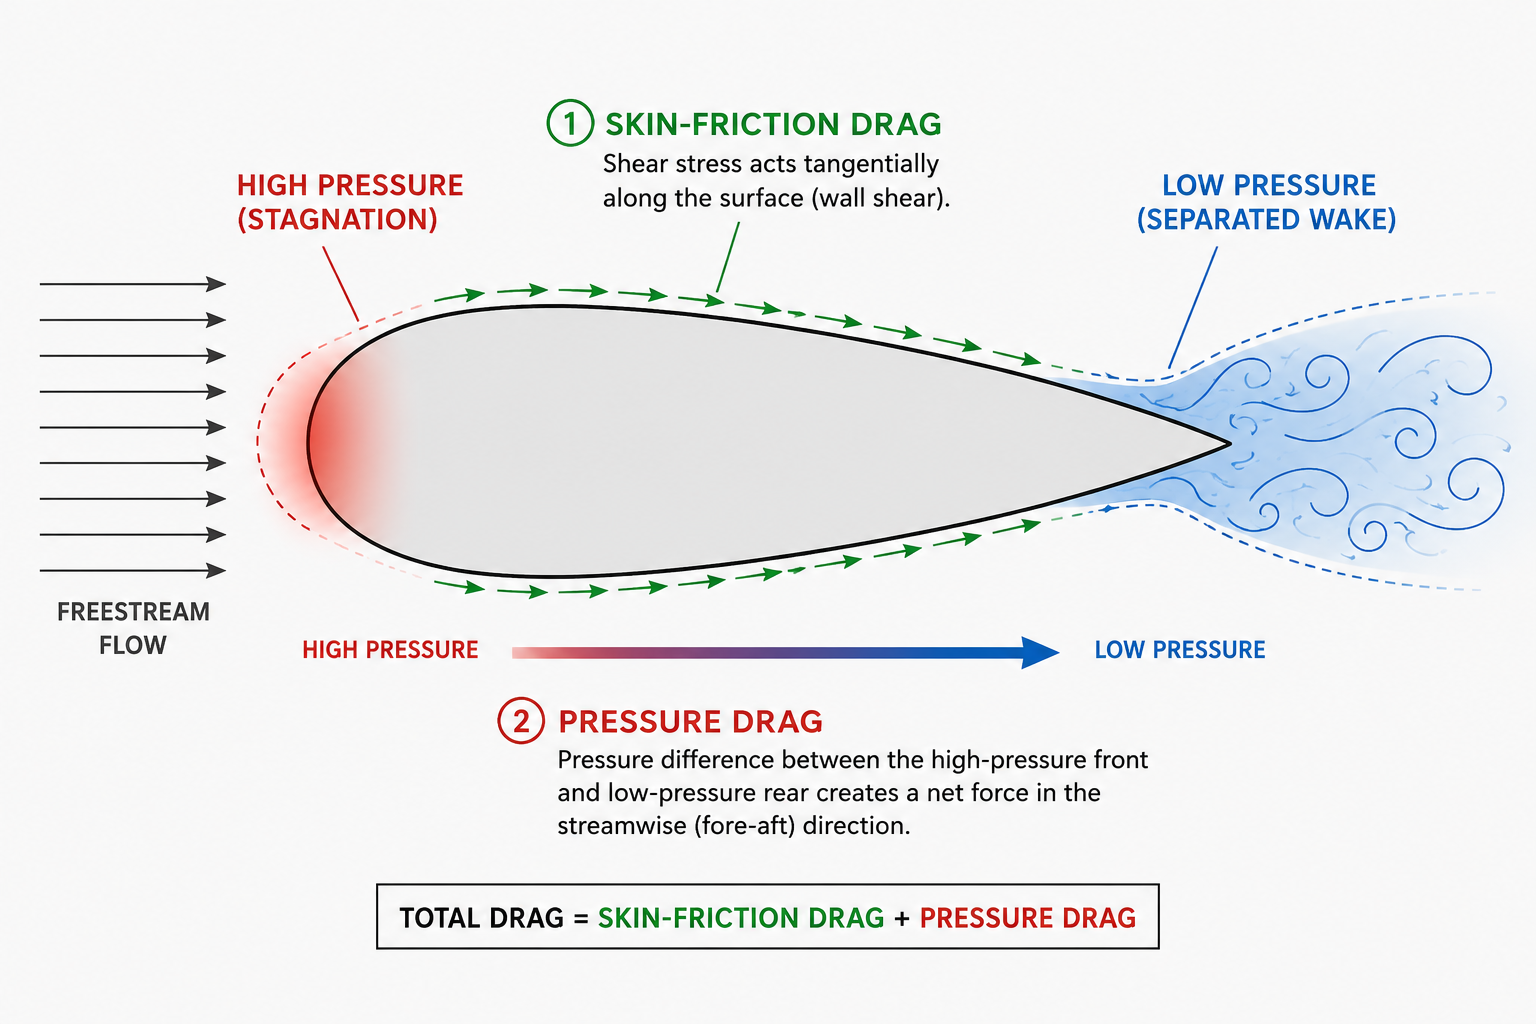
Before the setup choices make sense, it helps to remember that drag has two sources. Skin-friction drag comes from the fluid shearing along the surface. It’s the wall shear stress integrated over the wetted area. Pressure (form) drag comes from the fore-and-aft pressure difference, which is dominated by where and how the flow separates from the body.
That split is the whole story, because the two error sources map straight onto it: your near-wall mesh (y+) controls how accurately you capture wall shear stress skin friction and your turbulence model controls how accurately you predict separation pressure drag. A streamlined body (an airfoil, a clean fairing) is skin friction dominated. A bluff body (an enclosure, a box, a blocky drone frame) is pressure-drag dominated. Knowing which regime you’re in tells you which mistake will hurt you most.
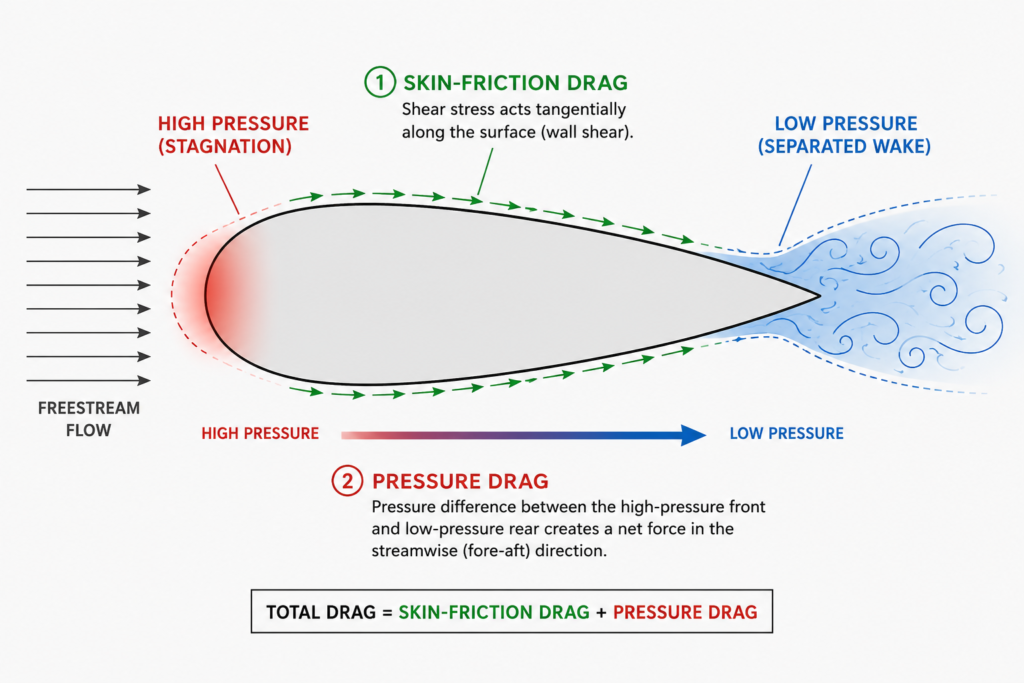
Skin-friction drag (surface shear) vs pressure drag (the fore-aft pressure difference and separated wake).
Right at the wall, the flow organizes itself into layers. Pressed against the surface is the viscous sublayer, where viscosity dominates (roughly y+ < 5). Farther out is the log-law region, where turbulence dominates (roughly y+ > 30). Between them sits the buffer layer a transition zone that no simple model describes well.
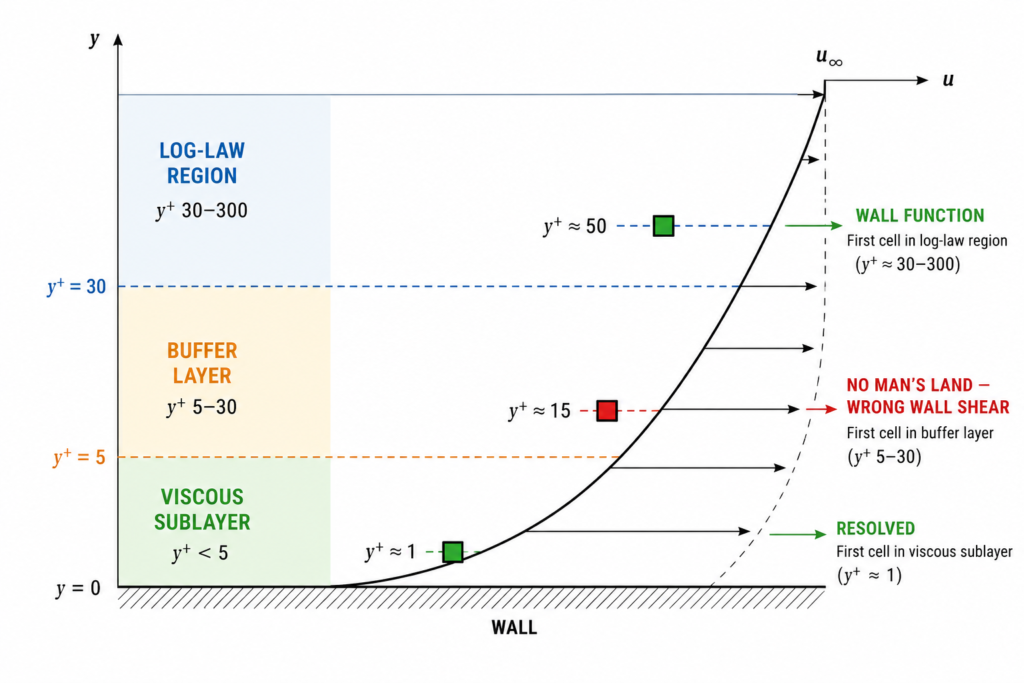
Viscous sublayer, buffer layer, and log-law region and where the first cell should (green) and shouldn’t (red) land.
y+ is just a non-dimensional measure of how far your first cell sits from the wall, and it’s the single most important meshing number in a drag simulation. You get two legitimate strategies:
The expensive mistake is landing in between. A first cell at y+ ≈ 5–30 the buffer layer is resolved by neither approach. The wall shear stress comes out wrong, and because skin-friction drag is a direct integral of wall shear stress, your drag comes out wrong with it. Worse, most people never check: they mesh by feel, run, and never look at the y+ their mesh actually achieved. Modern “all-y+” or scalable wall treatments soften this, but they don’t excuse an unchecked mesh.
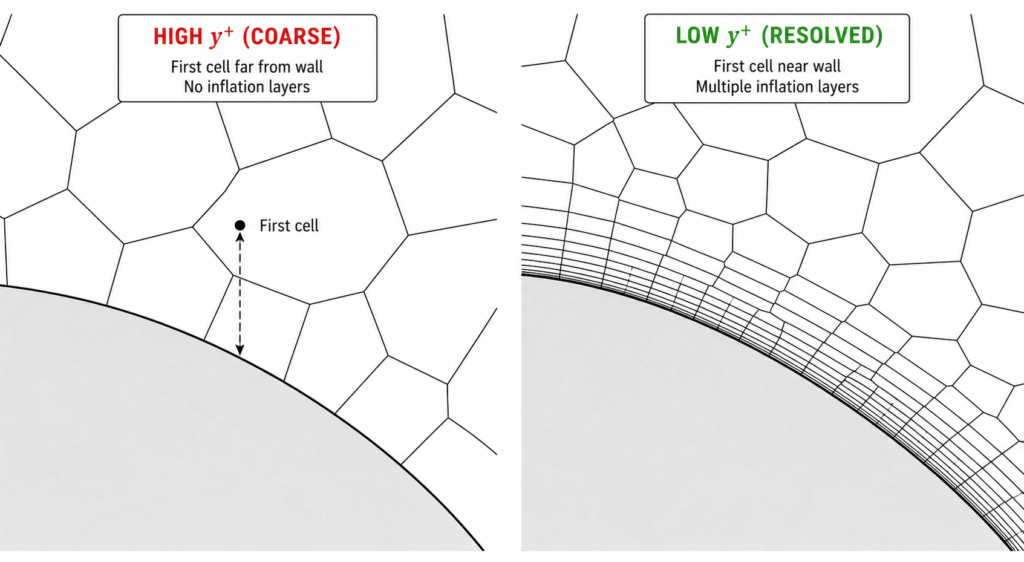
A coarse first cell far from the wall (left) vs a low-y+ prism-layer stack hugging the surface (right).
RANS turbulence models are approximations, and each is good at different things. Treating the selector as a formality is where the other half of the 40% comes from.
Standard k-ε is robust, cheap, and reasonable in fully turbulent, attached, free-shear flows. But it is notoriously poor under adverse pressure gradients: it keeps the flow attached too long, so it delays or misses separation entirely. On a bluff body, missing separation means under-predicting pressure drag sometimes massively.
k-ω SST (Menter’s shear-stress transport) is the modern workhorse for external and separated flows precisely because it behaves well near walls and under adverse pressure gradients, blending k-ω behavior near the surface with k-ε behavior in the freestream. It’s the right default for most drag work but only if your mesh earns it. SST’s near wall accuracy needs a low -y+ mesh; run it on a coarse, high -y+ mesh and you’ve selected a good model and then starved it of the resolution it needs.
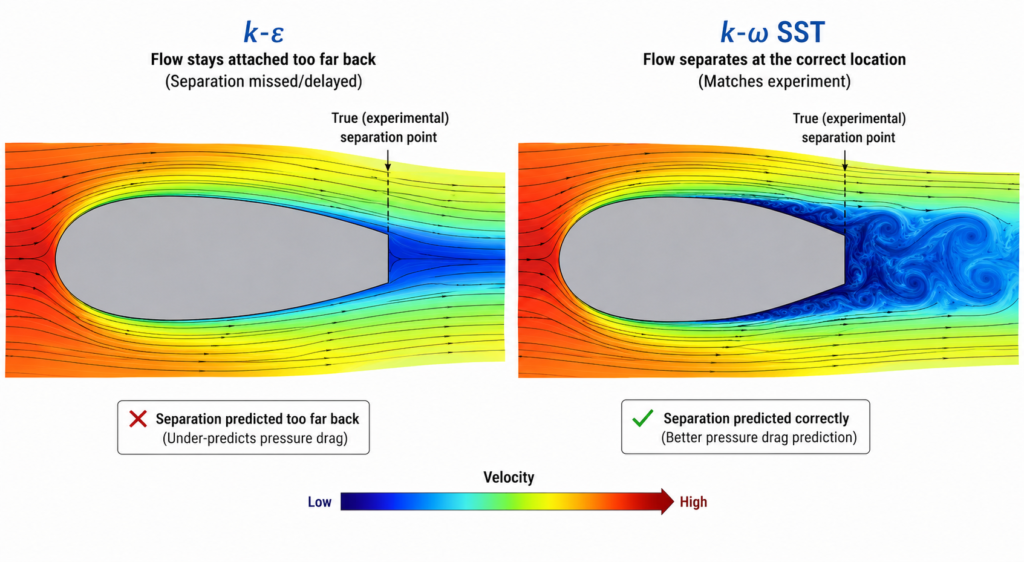
k-ε keeps the flow attached too long and misses separation (left); k-ω SST captures it at the real separation point (right).
Because SST is the sensible default, it has become a reflex and reflexes skip thinking. Two things it does not do on its own:
Transition. Standard SST assumes the boundary layer is turbulent everywhere. On low-Reynolds-number bodies small drones, compact ducts, anything at model scale a large run of the surface is actually laminar. Modeling it as fully turbulent over predicts skin friction, and drag inflates with it. Capturing this needs a transition model (such as γ–Reθ SST), not bare SST.
Unsteadiness. Steady RANS produces one time-averaged answer. A bluff body sheds a vortex street. An inherently unsteady wake and steady RANS can only approximate its average, sometimes poorly. When the wake dominates the drag, you may need unsteady RANS or a scale-resolving approach (DES/LES) to get an honest number.
SST is a great starting point. It is not a substitute for matching the model to the physics.
In practice, a badly wrong Cd is rarely one big blunder it’s a stack of small, invisible ones:
Any one of these can move Cd by 10 to 20%. Two or three together are where the 40% lives.
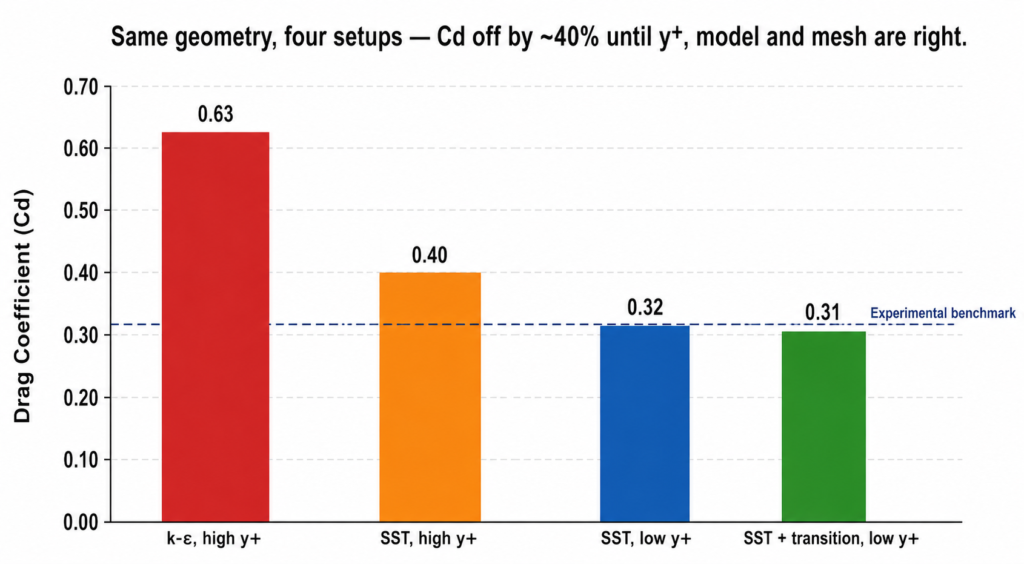
The same geometry, four setups. Cd swings by ~40% and only settles onto the benchmark once y+, model, and mesh are right together.
None of this is exotic. It’s discipline:
A drag coefficient is a single, clean-looking number — which is exactly what makes it dangerous. It hides every assumption that went into producing it. The difference between a Cd you can design a product around and one that quietly wrecks your range or cooling estimate isn’t the solver you bought; it’s whether the person driving it understood y+ and matched the turbulence model to the physics.
At Developmech, we set up CFD to be validated and mesh-independent before a single number leaves the report because a drag figure is only worth as much as the setup behind it. If you’ve got a flow problem where the numbers have to be right, we’re glad to take a look.
