Address
Malik Saleem Plaza, New City, Wah
Pakistan
WhatsApp: +92 327 5100047
Email: info@developmech.com
Work Hours
Monday to Friday: 3PM - 11AM
Weekend: 10AM - 5PM
Address
Malik Saleem Plaza, New City, Wah
Pakistan
WhatsApp: +92 327 5100047
Email: info@developmech.com
Work Hours
Monday to Friday: 3PM - 11AM
Weekend: 10AM - 5PM

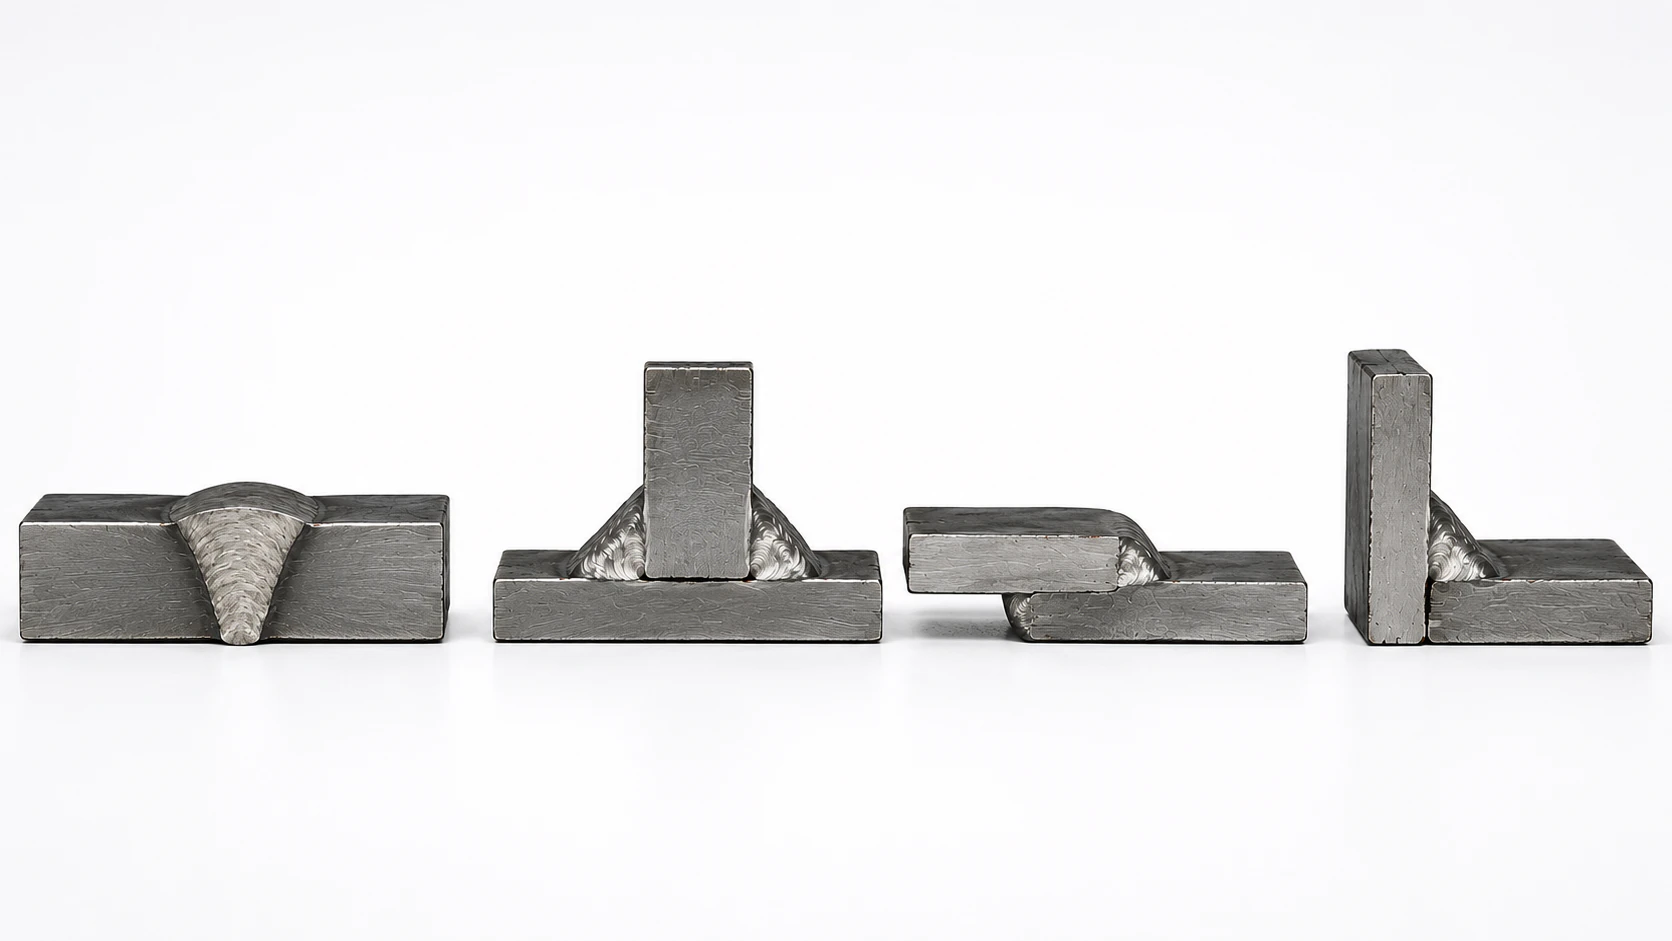
The welding joint you choose sets the load path and the fatigue life long before the arc is struck, and picking the wrong one is a structural mistake, not a detailing one
Developmech | Structural, Fatigue & Fracture Analysis
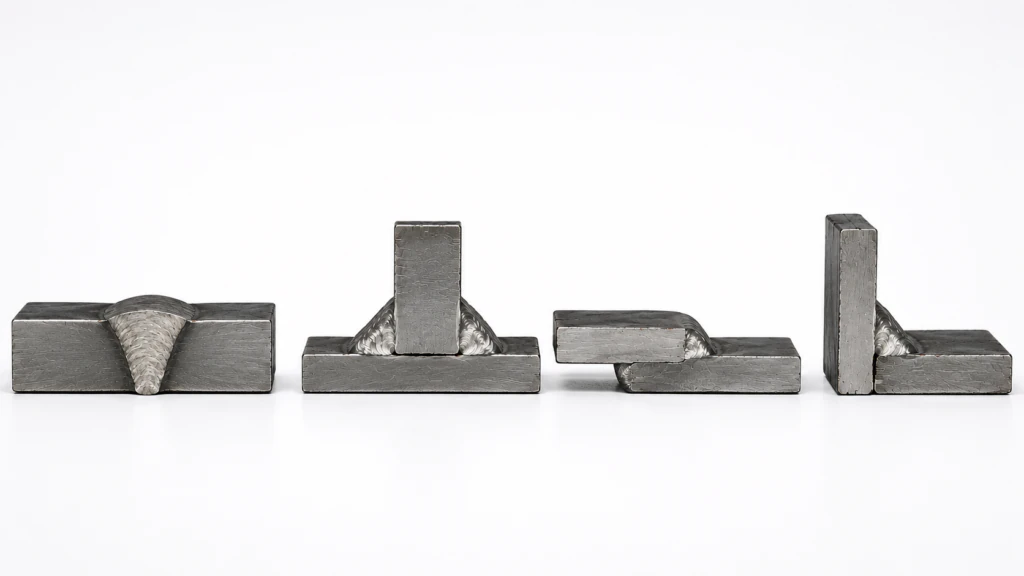
Search for welding joints and you get a tidy catalogue: butt, tee, lap, corner, edge, each with a neat diagram. It reads like a menu, as if the joint were simply how you happen to fit two parts together before welding. It is not. The joint type is the load path. It decides how the force travels from one part to the other, where the stress concentrates, and how long the assembly lasts.
The same two plates, joined five different ways, give five different structures with five different fatigue lives, and the gap between best and worst is not small. A butt joint and a single lap of the same plates can differ by a factor of several in fatigue strength with an identical weld. The weld can be flawless and the joint still wrong.
Here are the five welding joints, what each does under load, and the one thing they all share.
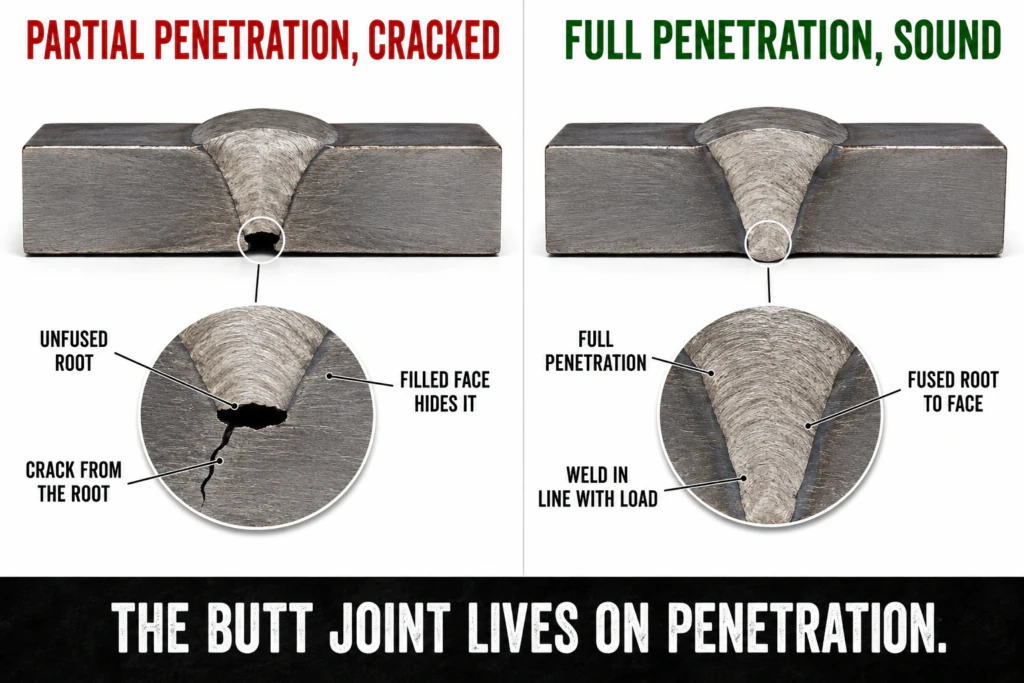
A full penetration butt weld carries the load in line, like the parent metal. Leave the root unfused and that gap is a crack sitting in the middle of the load path.
A butt joint sets the two parts end to end and fills the gap, so the weld sits directly in the line of the load and carries it as the parent metal would if it were continuous. That is its strength and its trap. Reach full penetration, root to face, and the joint is as strong as the plate. Fall short, and the unfused root is a sharp planar gap in the most highly stressed part of the joint, behaving like a crack that is already there. A ground flush butt weld looks identical from the surface whether it reached the root or not, which is why butt joints live and die on penetration and on inspection of the root.
The cost. A butt joint that looks perfect and carries a fraction of its intended load, with an unfused root that starts a fatigue or brittle crack in the worst possible place.
The fix. Detail the butt joint for full penetration and prove it. Use the right groove preparation for the thickness and access, weld from both sides or use a backing where you cannot, and verify the root with volumetric inspection rather than trusting the face. Where full penetration is not achievable, treat the joint as partial penetration in the calculation, not as a full strength weld.
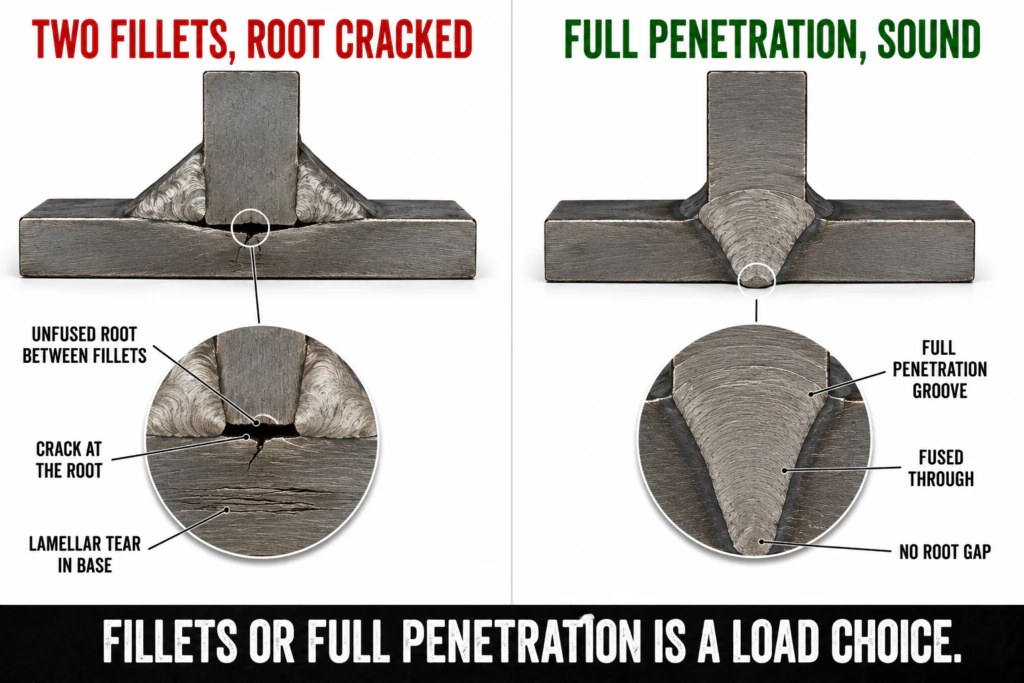
A tee carried by two fillet welds fails at the unfused root. When the load pulls through the plate, it needs a full penetration groove, not a bigger fillet.
A tee joint stands one part up on another, and how you weld it is a structural decision. Two fillet welds, one each side, are quick and often enough, but they leave the space between them unfused, so the root is a built in crack and the weld carries everything through its throat in shear. When the tee is a primary load path, especially when the load tries to peel the upright off the base, fillets are not enough and the joint needs a full penetration groove. There is also a quieter failure, where the load pulls through the base plate thickness and tears it in layers, called lamellar tearing, which no weld will fix.
The cost. A tee that cracks at the unfused fillet root under a load it was never detailed for, or a base plate that tears through its thickness under a through plate pull.
The fix. Match the tee to its load. Use fillet welds where the load runs along the joint, switch to a full penetration groove where the load pulls the upright off the base, size the throat for the real shear, and specify through thickness tested plate where the load pulls through the base.
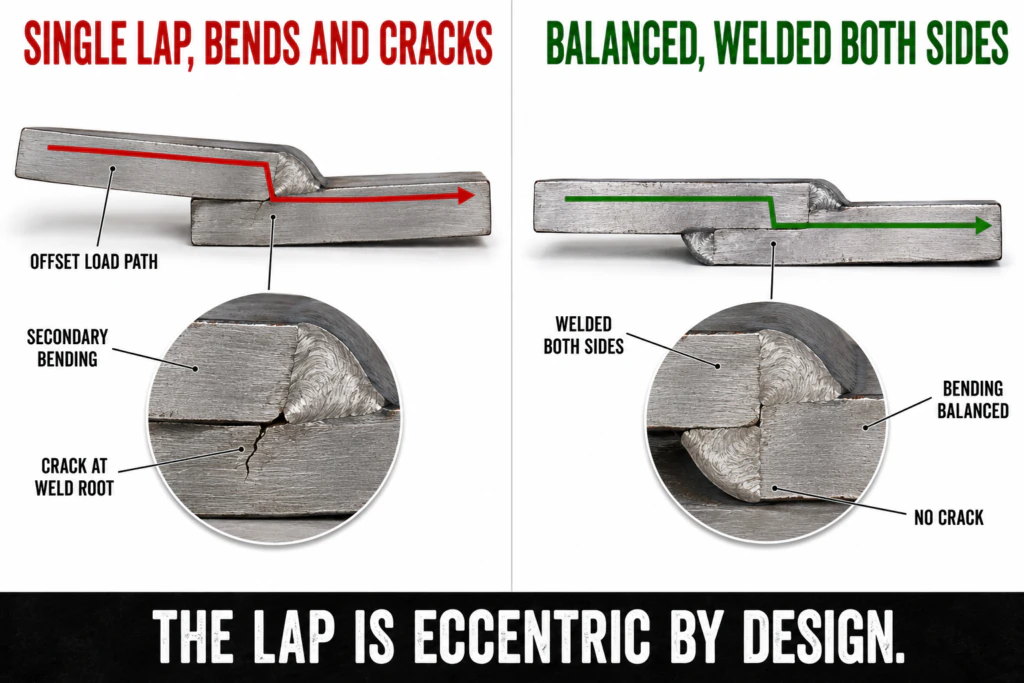
A lap sets the two plates side by side, so the load runs through them offset and bends the joint. That secondary bending is why the lap is one of the lowest fatigue classes there is.
A lap joint overlaps the two parts and welds along the overlap, which makes it the easiest joint to fit and one of the worst to load. Because the plates sit side by side rather than in line, the force does not run straight through, it steps across the overlap, and that offset bends the joint every time it is loaded. A single fillet on one side is the worst case, with nothing to balance the bending. The joint works, but the secondary bending and the sharp weld root put it among the lowest fatigue classes in the code, so a lap that is fine for a light bracket is a poor choice anywhere the load cycles.
The cost. A lap joint that fatigues far sooner than expected, cracking at the weld root from the bending the offset built into it.
The fix. Use the lap where it belongs and detail it honestly. Weld both sides to balance the bending where you can, keep laps out of primary fatigue paths, and where an in line load matters, use a butt or a properly detailed tee instead of reaching for the lap because it is easy to fit.
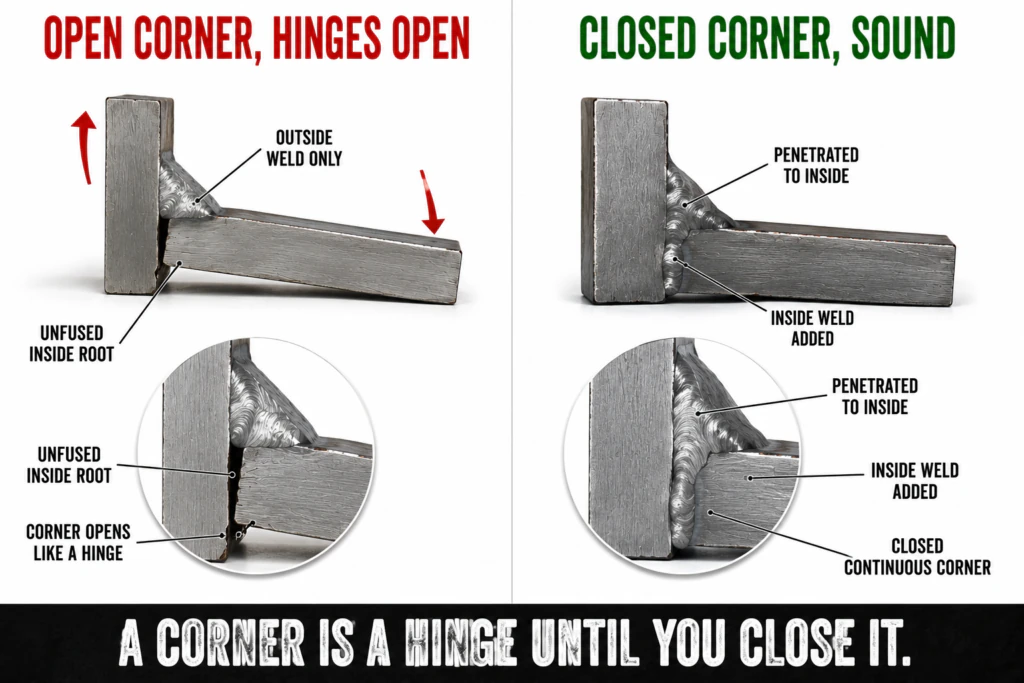
An open corner welded only on the outside is a hinge with a crack at the inside root. A load carrying corner needs penetration to the inside, not just a neat outside bead.
A corner joint brings two parts together at their edges to form an angle, and it is everywhere in frames, boxes, and enclosures. The trap is that a corner welded only on the outside, the inside left open and unfused, is mechanically a hinge with a sharp crack at the inside root. It holds light loads and looks clean, but the moment it has to carry a real bending or prying load, that unfused inside root is where it opens. A load carrying corner needs penetration through to the inside, or a weld on the inside as well, so the joint is closed rather than a folded seam.
The cost. A corner that opens at the unfused inside root under bending or prying, in a frame or enclosure that looked perfectly welded from the outside.
The fix. Detail the corner for its duty. Where it carries load, penetrate to the inside or add an inside weld so the corner is closed, prepare the edges for the penetration you need, and reserve the simple outside only corner for light or sealing duty where nothing tries to open it.
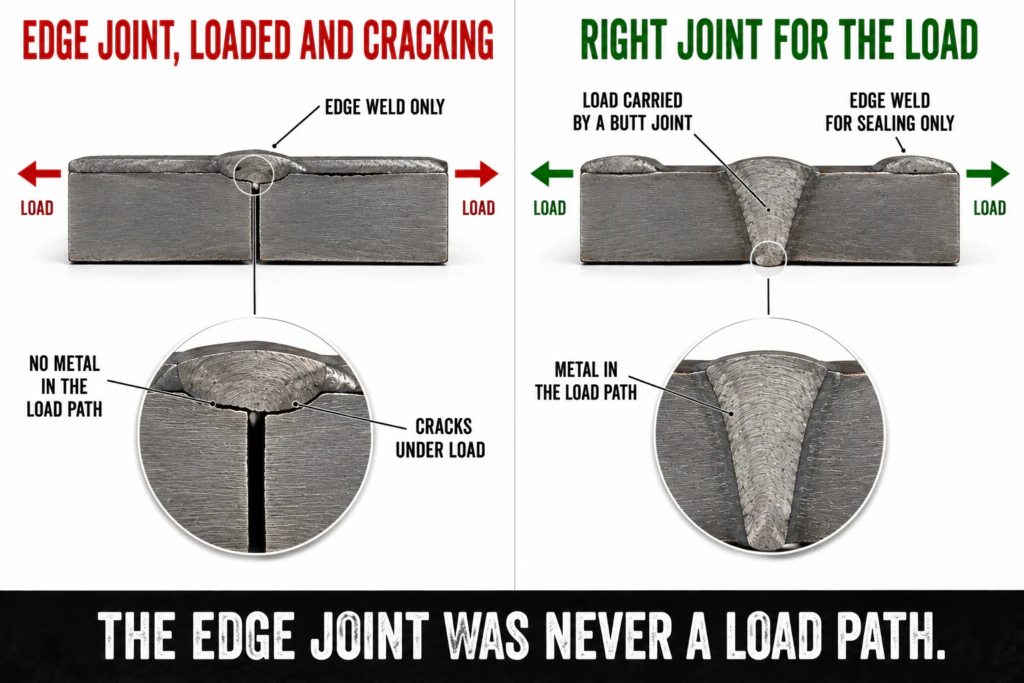
An edge joint welds two plates along their edges, laid together. It seals and locates, but it was never a load path, and loading one is a slow way to a crack.
An edge joint lays two parts side by side and welds along their common edge, and unlike the others it is barely a structural joint at all. It is good for sealing, locating parts, and tidying an edge, but the weld sits on the surface and does not tie the parts together through any real thickness, so it can barely carry a load that pulls or bends the parts apart. The failure is quiet and common: an edge joint used because it was convenient, in a place that turned out to carry load, cracking slowly because it was never meant to be there.
The cost. An edge joint slowly cracking under a load it was never intended to carry, in a spot where a load bearing joint should have been used.
The fix. Keep the edge joint to what it is good at. Use it for sealing, location, and light duty, and wherever the parts actually have to carry load between them, choose a butt, tee, or properly detailed joint that puts metal in the load path instead of a bead along an edge.
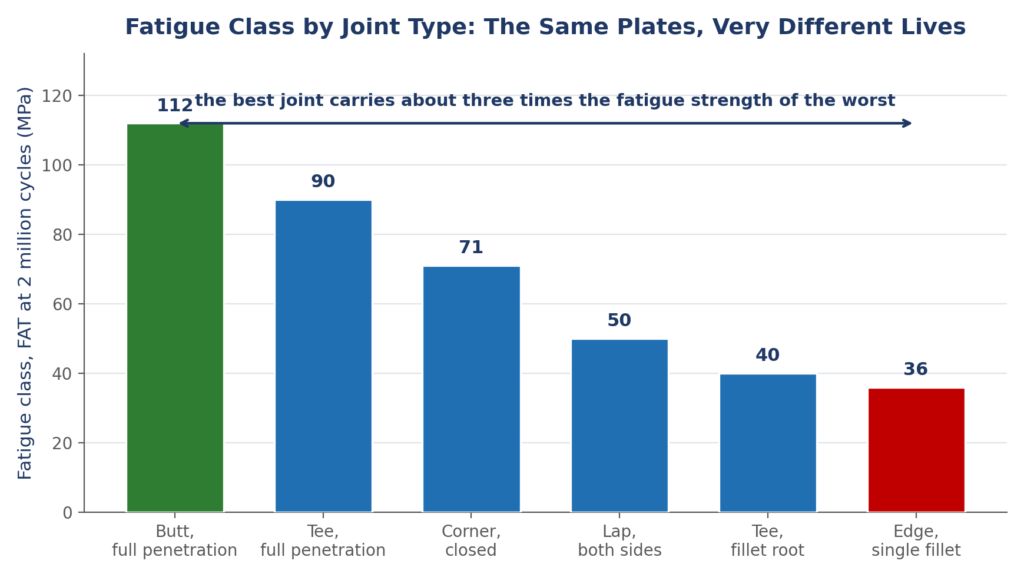
The same two plates, welded as different joints, land on different fatigue classes in the code. The gap between the best joint and the worst is several times, not a few percent.
None of this is opinion, because the fatigue codes have already measured it. Every welding joint and detail maps to a fatigue class, a curve set by the geometry of the joint, and the classes are far apart. A well detailed full penetration butt weld sits near the top, a load carrying fillet or a single lap sits near the bottom, and the same two plates can move by a factor of several in fatigue strength purely by which joint you chose. Choosing the joint is choosing the fatigue life, and it happens on the drawing, long before anyone strikes an arc.
The cost. A structure detailed for the strength of its plate but governed by the fatigue class of its weakest joint, failing on cycles nobody counted because the joint choice was treated as a fit up detail.
The fix. Pick the joint by its fatigue class, not by how easy it is to fit. Identify the class of every welded joint in the load path, choose the type that gives the life you need, and where a joint controls the design, change its type or detail rather than accept the penalty the easy joint carries.
The five welding joints are not five ways to fit two parts together, they are five different load paths with five different lives. The butt puts the weld in line and lives on penetration, the tee chooses between fillets and full strength, the lap builds in the bending that shortens it, the corner is a hinge until you close it, and the edge was never a load path at all. Pick the joint by how the force has to travel and how long it has to last, and the weld has a chance. Pick it by how the parts happen to sit together, and the cleanest weld in the world will still crack, because the joint was wrong before the arc was ever struck.
At Developmech, we do the structural engineering behind the weld: joint selection and detailing for the load path, fatigue assessment of welded joints by code and by fracture mechanics, and the analysis that decides whether a joint carries its load for the life you need. If you build welded structures that have to last, we are glad to take a look.
