Address
Malik Saleem Plaza, New City, Wah
Pakistan
WhatsApp: +92 327 5100047
Email: info@developmech.com
Work Hours
Monday to Friday: 3PM - 11AM
Weekend: 10AM - 5PM
Address
Malik Saleem Plaza, New City, Wah
Pakistan
WhatsApp: +92 327 5100047
Email: info@developmech.com
Work Hours
Monday to Friday: 3PM - 11AM
Weekend: 10AM - 5PM

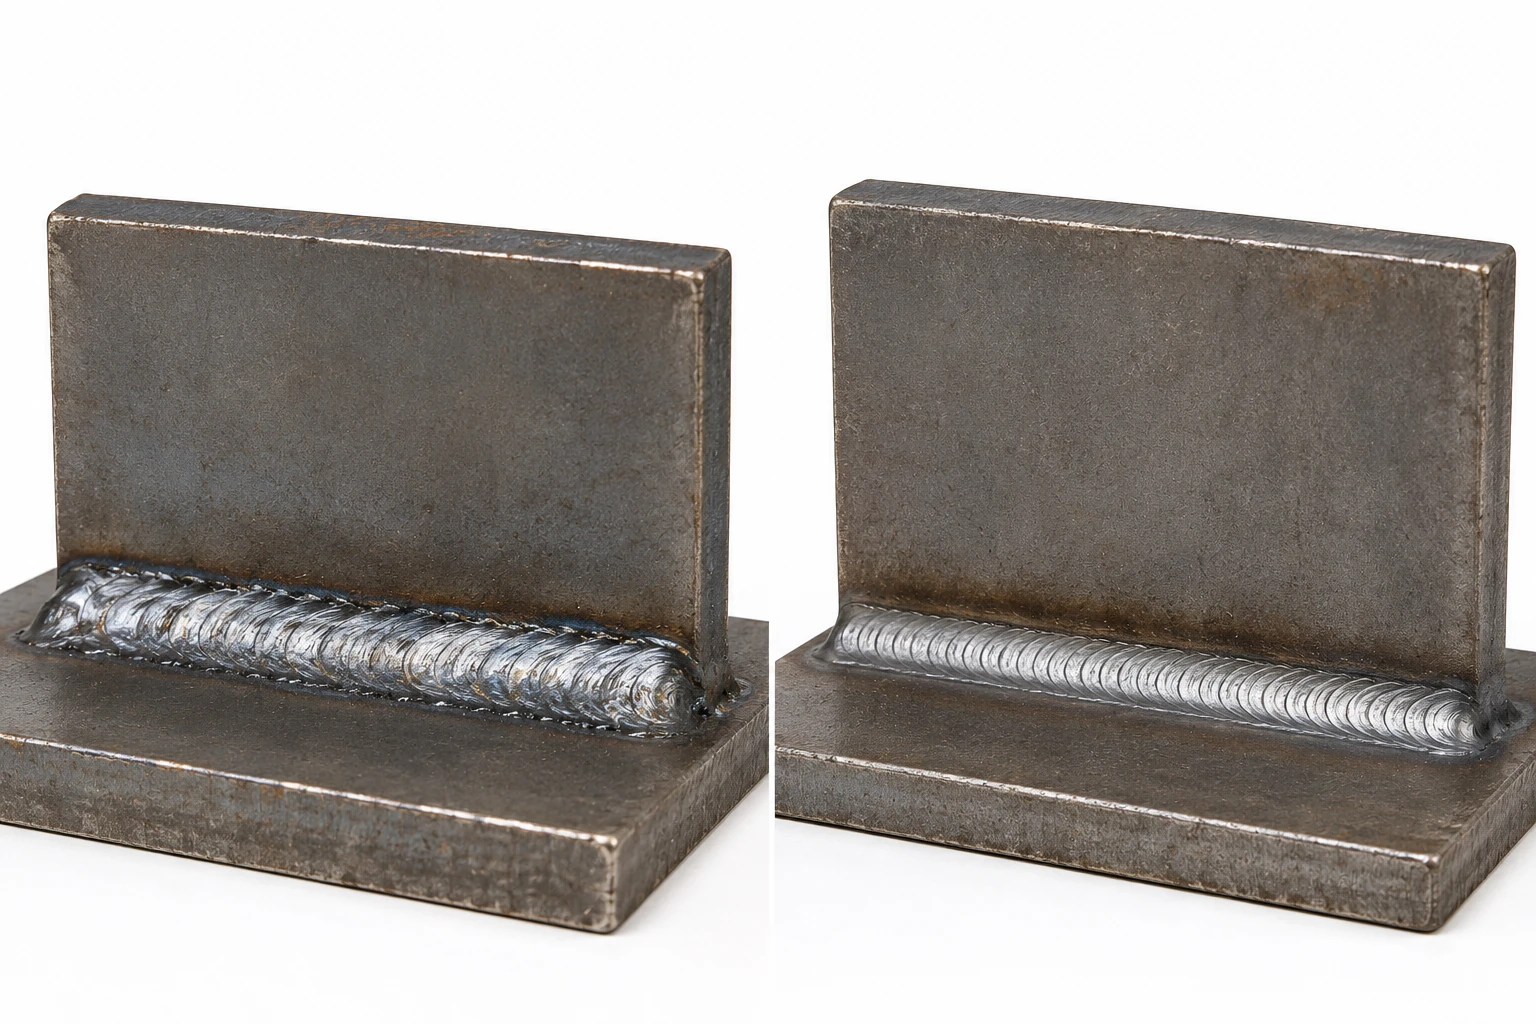
A weld decides the fatigue life, the distortion, and the fracture resistance of the whole structure, and a visual inspection measures none of it
Developmech | Structural, Fatigue & Fracture Analysis
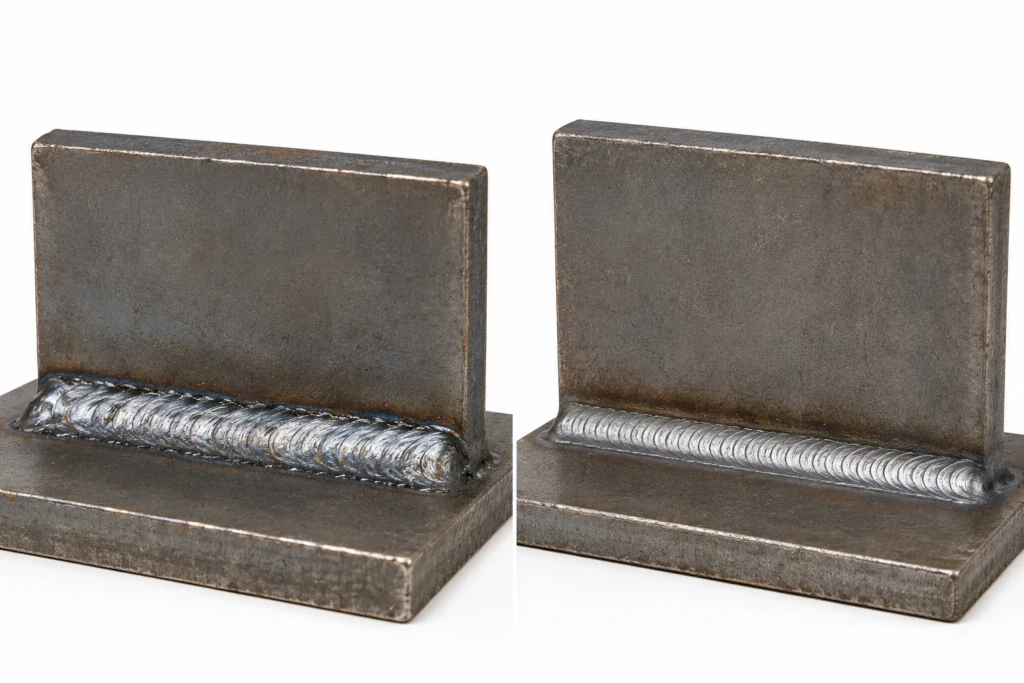
Ask how to weld two steel parts together and you get a process answer: MIG, TIG, stick, flux cored, pick one and lay a bead. Ask why welded structures fail and the answer is almost never that the weld was not strong enough to hold the static load. They crack at the toe. They distort out of tolerance. They crack cold in the heat affected zone days after the welder has gone home. A weld is not the step where two parts are joined. It is a metallurgical and structural event that reshapes the fatigue life, the residual stress, and the fracture resistance of the whole assembly.
That gap matters, because the weld symbol on the drawing and a clean visual inspection measure almost none of it. A weld that looks perfect can be the single weakest fatigue detail in the structure, sitting on a band of embrittled metal, over a flaw nobody can see. The process picks how the metal is deposited. It says nothing about whether the joint will survive ten million cycles.
Here are the six structural and metallurgical reasons welded joints fail, and what each one costs.
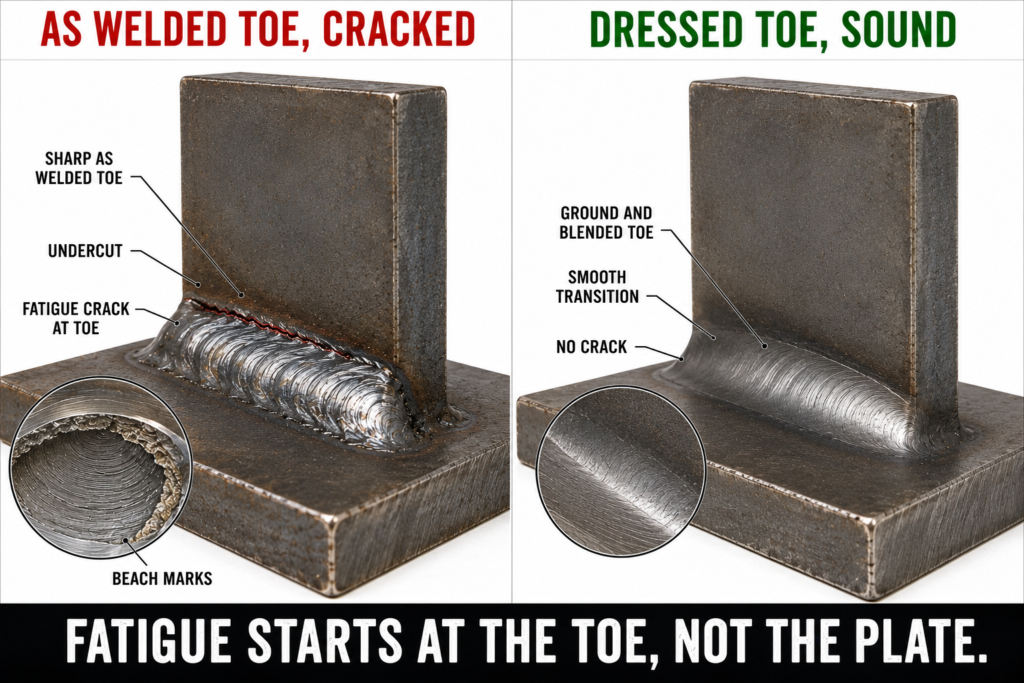
Fatigue almost always starts at the weld toe, the sharp line where weld meets plate. Grind that notch away and the same joint lasts far longer.
The plate is rarely where a welded structure cracks. Fatigue almost always starts at the weld toe, the sharp line where the weld metal meets the parent plate. Two things make it the weakest point. The as welded toe is a sharp geometric notch that concentrates stress, and welding leaves tensile residual stress there at close to yield, so even a modest load cycles from a high mean. The result is that the fatigue strength of a welded joint is a fraction of the plain plate it is made from, and it barely depends on how strong the steel is. Buy a higher grade steel and fatigue gives you almost nothing back if the toe is left as welded.
The cost. Fatigue cracks that start at the toe and grow through the section under loads well below yield, in structures that passed every static check.
The fix. Design and treat the toe. Grind or dress it to remove the notch and the tiny slag intrusions welding leaves behind, use weld profiles that give a smooth transition, and where it matters apply burr grinding, TIG dressing, or peening that also relaxes the residual stress. Classify every welded detail by its fatigue category and design to it.
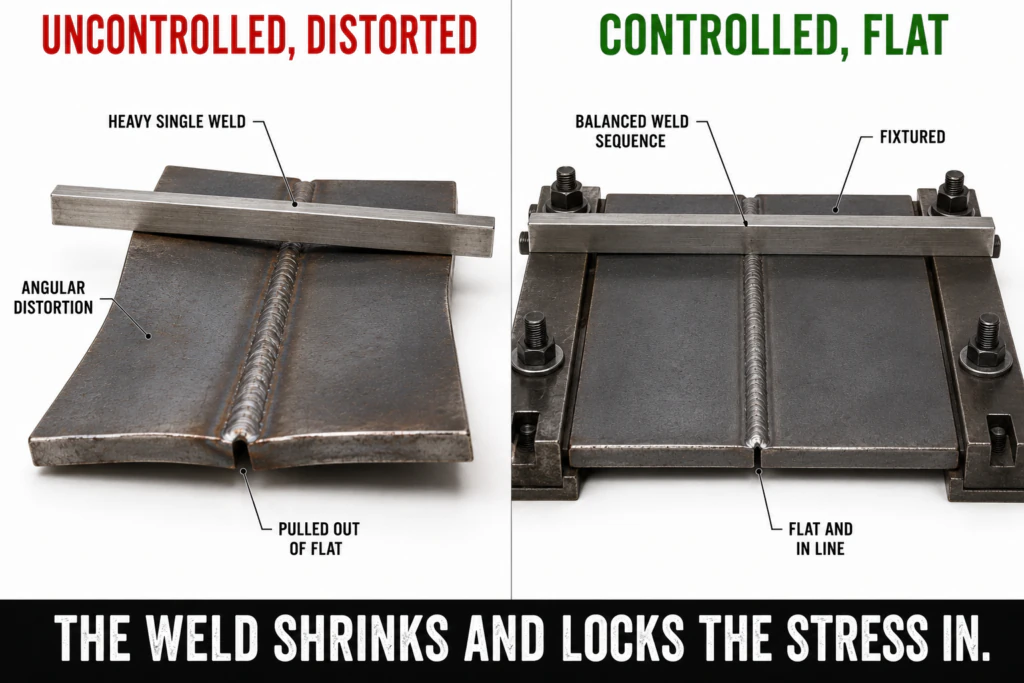
A weld shrinks as it cools, so it distorts the structure and locks in tensile residual stress near yield, right where fatigue starts.
A weld goes in molten and cools to solid, and as it cools it wants to shrink. The cold metal around it will not let it, so the weld and the zone beside it are left with tensile residual stress, often right at the yield strength, balanced by compression further out. That has two consequences. The structure distorts, pulling out of flat and out of line as each weld shrinks. And the locked in tensile stress sits on top of every service load, which is exactly why the weld toe is such a poor place for fatigue. Distortion pulled back straight by force only moves the stress around, it does not remove it.
The cost. Parts that do not fit at assembly, structures out of tolerance, and a hidden tensile stress field that quietly worsens fatigue and stress corrosion.
The fix. Control the heat, not just the weld. Balance and sequence the welds so shrinkage cancels, use the smallest weld and heat input that does the job, and plan the welding order and fixturing to manage distortion. Where residual stress matters, specify post weld heat treatment to relieve it rather than living with it.
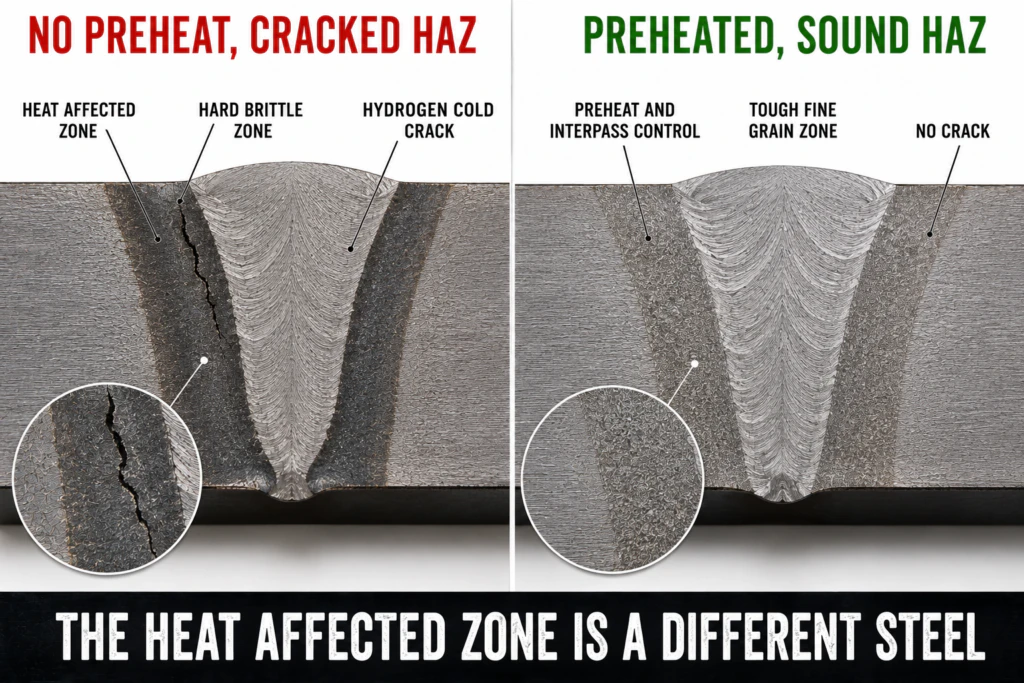
The band of parent metal beside the weld is reheated and fast cooled into a harder, less tough steel, and hydrogen can crack it cold, days later.
The weld metal gets the attention, but the part that often fails is the heat affected zone, the band of parent metal beside the weld that was heated and cooled without ever melting. That thermal cycle changes the steel. Cool it too fast and the zone turns hard and brittle. Add hydrogen from damp electrodes, rust, or oil, and a hard zone under residual tension will crack hours or days after welding, cold, with no warning. The toughness there can be far below the parent plate, so a structure that is ductile everywhere else can carry a brittle band running right alongside every weld.
The cost. Hydrogen cracks that appear after the job is signed off, and low toughness zones that can trigger brittle fracture from a small defect.
The fix. Control the metallurgy. Match preheat and interpass temperature to the steel and the section thickness to slow the cooling, keep hydrogen out with dry consumables and clean joints, and set the heat input to control the zone. Qualify the procedure with hardness and toughness testing of the heat affected zone, not just the weld metal.
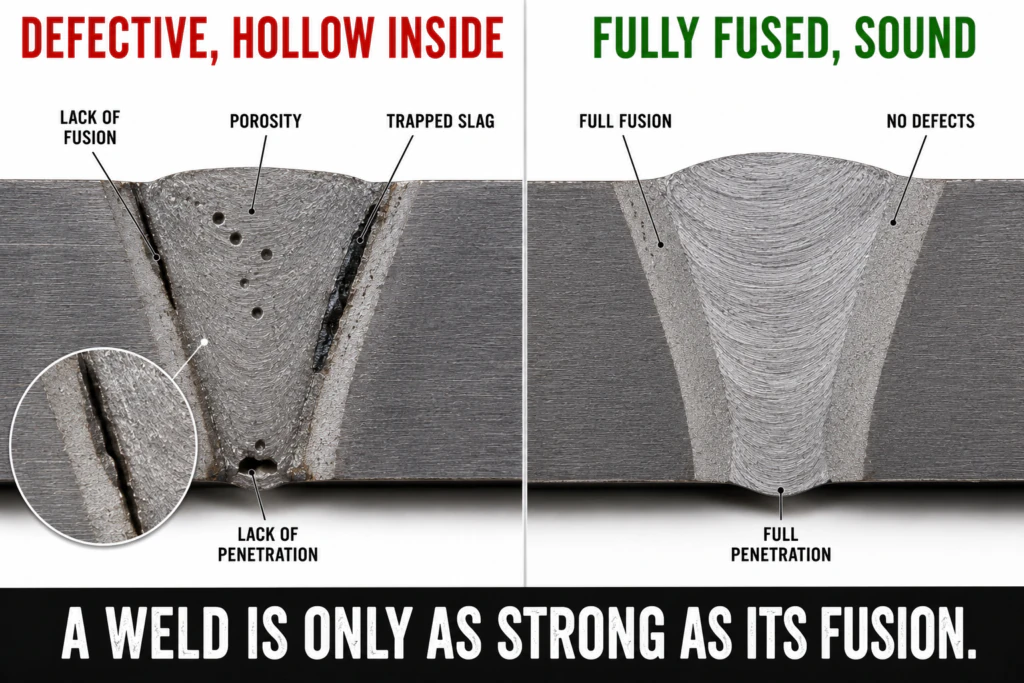
Lack of fusion, lack of penetration, porosity, and slag are internal flaws a visual pass cannot see, and each one acts as a crack that is already there.
A weld that looks right on the surface can be hollow underneath. Lack of fusion where the weld never bonded to the parent metal, lack of penetration where it never reached the root, porosity, and trapped slag are all internal defects a visual inspection cannot see. Each one acts as a crack that is already there. A lack of fusion flaw is the worst, because it is sharp and planar, exactly the shape fatigue and fracture start from. The joint carries load fine on the first day, and the flaw does the rest over the years that follow.
The cost. Joints running at a fraction of their intended strength, and sharp planar flaws that are ideal starting points for fatigue cracks and brittle fracture.
The fix. Build quality in through the procedure, then prove it. Qualify the welding procedure so full fusion and penetration are repeatable, and verify the critical welds with volumetric inspection, ultrasonic or radiographic, not just a visual pass. Set acceptance limits from a fracture mechanics view of which flaw size actually matters in that joint.
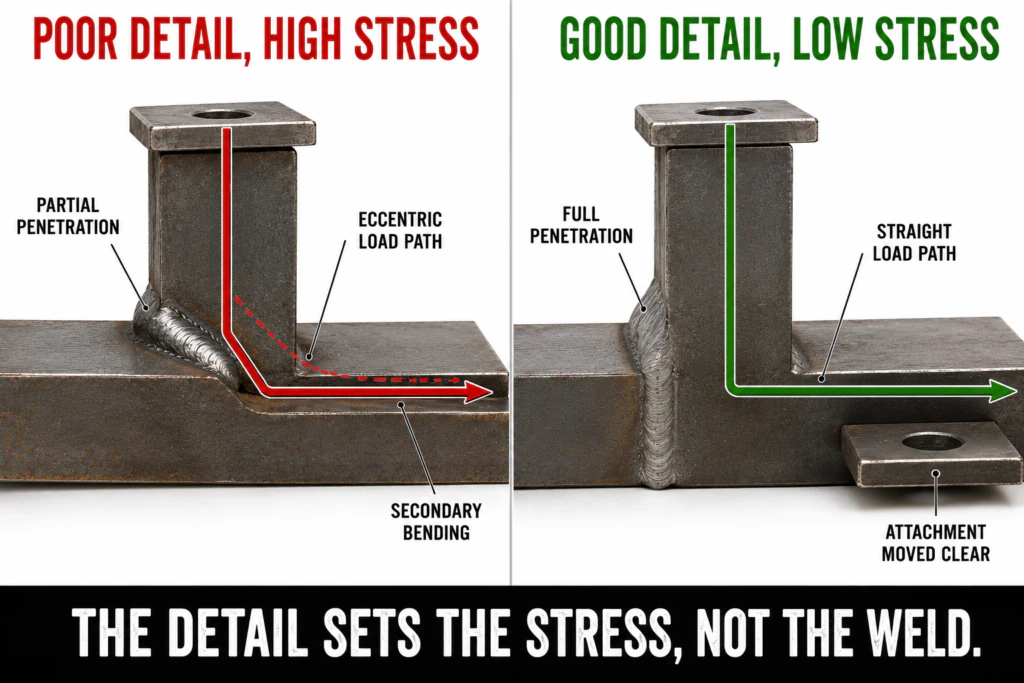
The joint detail fixes the load path and the stress concentration before anyone welds it. The same plates on a better detail last several times longer.
Most of a weld’s fatigue life is decided on the drawing, not at the arc. The joint detail fixes the load path and the stress concentration before anyone strikes an arc. A partial penetration weld carrying load through its throat, a fillet loaded across its root, a lap joint that pulls the load off line and bends the joint, or an attachment landed on a highly stressed surface will all concentrate stress no matter how clean the weld is. The same two members joined by a better detail can have several times the fatigue life.
The cost. Fatigue failures designed straight into the structure, in welds that were made perfectly to a detail that was wrong.
The fix. Design the detail, not just the weld. Carry primary load through full penetration welds, keep the load path straight to avoid secondary bending, move welds and attachments away from high stress regions, and choose the detail with its fatigue category in mind. Model the joint where the load path is not obvious.
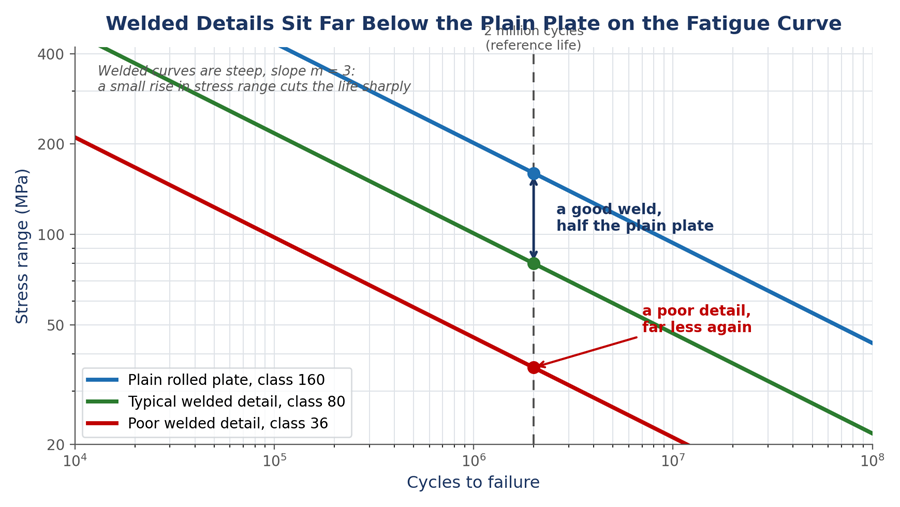
A plate has one fatigue strength. Weld a detail onto it and the code drops you onto a much lower curve set by that detail’s category.
You do not have to learn any of this the hard way, because the fatigue codes already contain it. A steel plate has one fatigue strength, and the moment you weld a detail onto it the code drops you onto a much lower curve chosen by the geometry of that detail, its category. On top of that, welded fatigue curves are steep, so a small rise in stress range cuts the life sharply. Two structures built from the same steel can differ by a factor of ten in fatigue life purely from which welded details they use. The number is not a safety factor, it is the measured behavior of that geometry.
The cost. Structures designed to the static strength of the steel that are actually governed by the fatigue category of their worst weld, and fail on cycles nobody counted.
The fix. Design welds by the fatigue code from the start. Identify the category of every welded joint, work in stress ranges against the right curve, and where a joint controls the life, improve its category by changing the detail or treating the toe rather than reaching for a stronger steel that fatigue will ignore.
A weld is not the moment two parts become one. It is the moment a structure acquires its worst fatigue detail, its residual stress, and its most brittle patch of metal, all at once. The parts do not tear along the plate. They crack at a toe that was left sharp, in a zone that cooled too fast, from a flaw nobody could see, on a detail that was wrong before the arc was struck. A weld symbol and a clean visual tell you the joint was made. They do not tell you what it will do after ten million cycles. That answer is structural and metallurgical, and most of it is decided long before the welder shows up.
At Developmech, we do the engineering behind the weld: fatigue assessment of welded details by code and by fracture mechanics, residual stress and distortion analysis, weld procedure and metallurgy review, and the joint design that decides whether a structure survives its cycles. If you build welded structures that have to last, we are glad to take a look.
